How Long Does It Take For Corn Mash To Ferment? 4 Step Guide

Key Takeaways
- Corn mash typically takes between 3-21 days to ferment completely, depending on your recipe and conditions.
- Temperature is the most critical factor affecting fermentation time – 75-85°F (24-29°C) is ideal for most yeasts.
- Using turbo yeast can reduce fermentation time to 3-5 days, while traditional yeasts with all-grain recipes may take up to two weeks.
- Proper mash consistency and preparation significantly impacts fermentation efficiency and overall flavor development.
- The fermentation process isn’t complete until all bubbling stops and hydrometer readings remain stable for 2-3 consecutive days.
Fermentation is where the magic happens in corn mash production. It’s the crucial stage that determines not only the alcohol content but also much of the flavor profile in your final product. Whether you’re crafting moonshine, whiskey, or bourbon, understanding fermentation timing can make the difference between a mediocre batch and something truly special.
The Perfect Corn Mash Fermentation Timeline: What to Expect

“Home Made Corn Mash Moonshine Recipe | 2025” from www.pinterest.com and used with no modifications.
When fermenting corn mash, patience truly is a virtue. While some recipes and conditions allow for fermentation in as little as 3-5 days, traditional methods often require 7-14 days for complete fermentation. The waiting game can be challenging, but rushing this process almost always leads to disappointing results with lower alcohol content and underdeveloped flavors. A properly fermented corn mash will reward you with higher yields and smoother character.
The timeline varies significantly based on multiple factors, which is why experienced brewers watch their mash rather than just the calendar. Fermentation progresses through distinct phases: an initial lag phase (12-24 hours) where little visible activity occurs, followed by a vigorous primary fermentation (2-7 days) characterized by bubbling and foaming, and finally, a slower secondary fermentation (3-14 days) where the remaining sugars are gradually consumed.
What Affects Corn Mash Fermentation Time?

“Thinking Man Icon Stock Illustrations …” from www.dreamstime.com and used with no modifications.
Understanding what influences fermentation duration helps you predict, control, and troubleshoot the process. While some factors like recipe composition are decided before you begin, others can be adjusted during fermentation to optimize results. Mastering these variables allows you to develop consistency across batches while adapting to seasonal changes and ingredient variations.
Temperature: The #1 Factor for Speed
Nothing impacts fermentation speed more dramatically than temperature. Most brewing yeasts perform optimally between 75-85°F (24-29°C), with fermentation slowing significantly below 70°F and potentially stalling completely below 60°F. At the other extreme, temperatures above 90°F can cause stress on yeast, producing off-flavors and sometimes even killing the yeast population.
Temperature stability is just as important as the absolute value. Sudden fluctuations can shock yeast and cause them to go dormant temporarily. This is why many experienced brewers use fermentation chambers, water baths, or temperature-controlled rooms to maintain consistent conditions. During winter months, fermentation can take up to twice as long if your space is too cool.
For most corn mash recipes, maintaining a steady 78°F (25.5°C) provides an excellent balance between fermentation speed and flavor development. At this temperature, you’ll typically see vigorous activity within 24 hours and completion within 5-10 days depending on other factors.
Yeast Type and Amount
The strain and quantity of yeast dramatically affect fermentation timing. Distiller’s yeasts and turbo yeasts are specially formulated for rapid fermentation, often completing in 3-5 days under ideal conditions. These high-performance strains are alcohol-tolerant and work quickly, though sometimes at the expense of subtle flavor development. Traditional baker’s yeast works too but typically takes 7-10 days and may not tolerate higher alcohol environments.
The amount of yeast you pitch also matters. Underpitching (using too little yeast) extends the lag phase and overall fermentation time, potentially allowing unwanted bacteria to gain a foothold. Overpitching generally doesn’t speed fermentation significantly but can sometimes create stress-related flavor issues. For most 5-gallon batches, one tablespoon of dried yeast provides sufficient cell count for healthy fermentation.

Sugar Content and Available Nutrients
Higher sugar concentrations generally mean longer fermentation times. A simple mash with 5 pounds of corn and 5 pounds of sugar will take longer to ferment than the same recipe with just 3 pounds of sugar. This is because yeast must work through all available fermentable sugars, and higher concentrations create more osmotic pressure on the yeast cells, potentially slowing their metabolism.
Mash Thickness and Consistency
The thickness of your corn mash significantly impacts fermentation speed. A mash that’s too thick restricts yeast movement and access to fermentable sugars, potentially extending fermentation by days. Conversely, an overly thin mash may ferment more quickly but can dilute flavor compounds. Aim for a consistency that’s thick enough to hold suspended grain particles but fluid enough that it moves easily when stirred – similar to a thick pancake batter. For more tips, you can check out this moonshine mash recipe.
Proper grain crushing and gelatinization during mash preparation ensures maximum sugar availability. Corn starches must be fully converted to fermentable sugars through proper cooking and enzymatic activity. Skipping or rushing the mashing process leaves unconverted starches that yeast can’t process, resulting in lower yields and potentially longer, incomplete fermentations.
4 Simple Steps to Fermenting Corn Mash
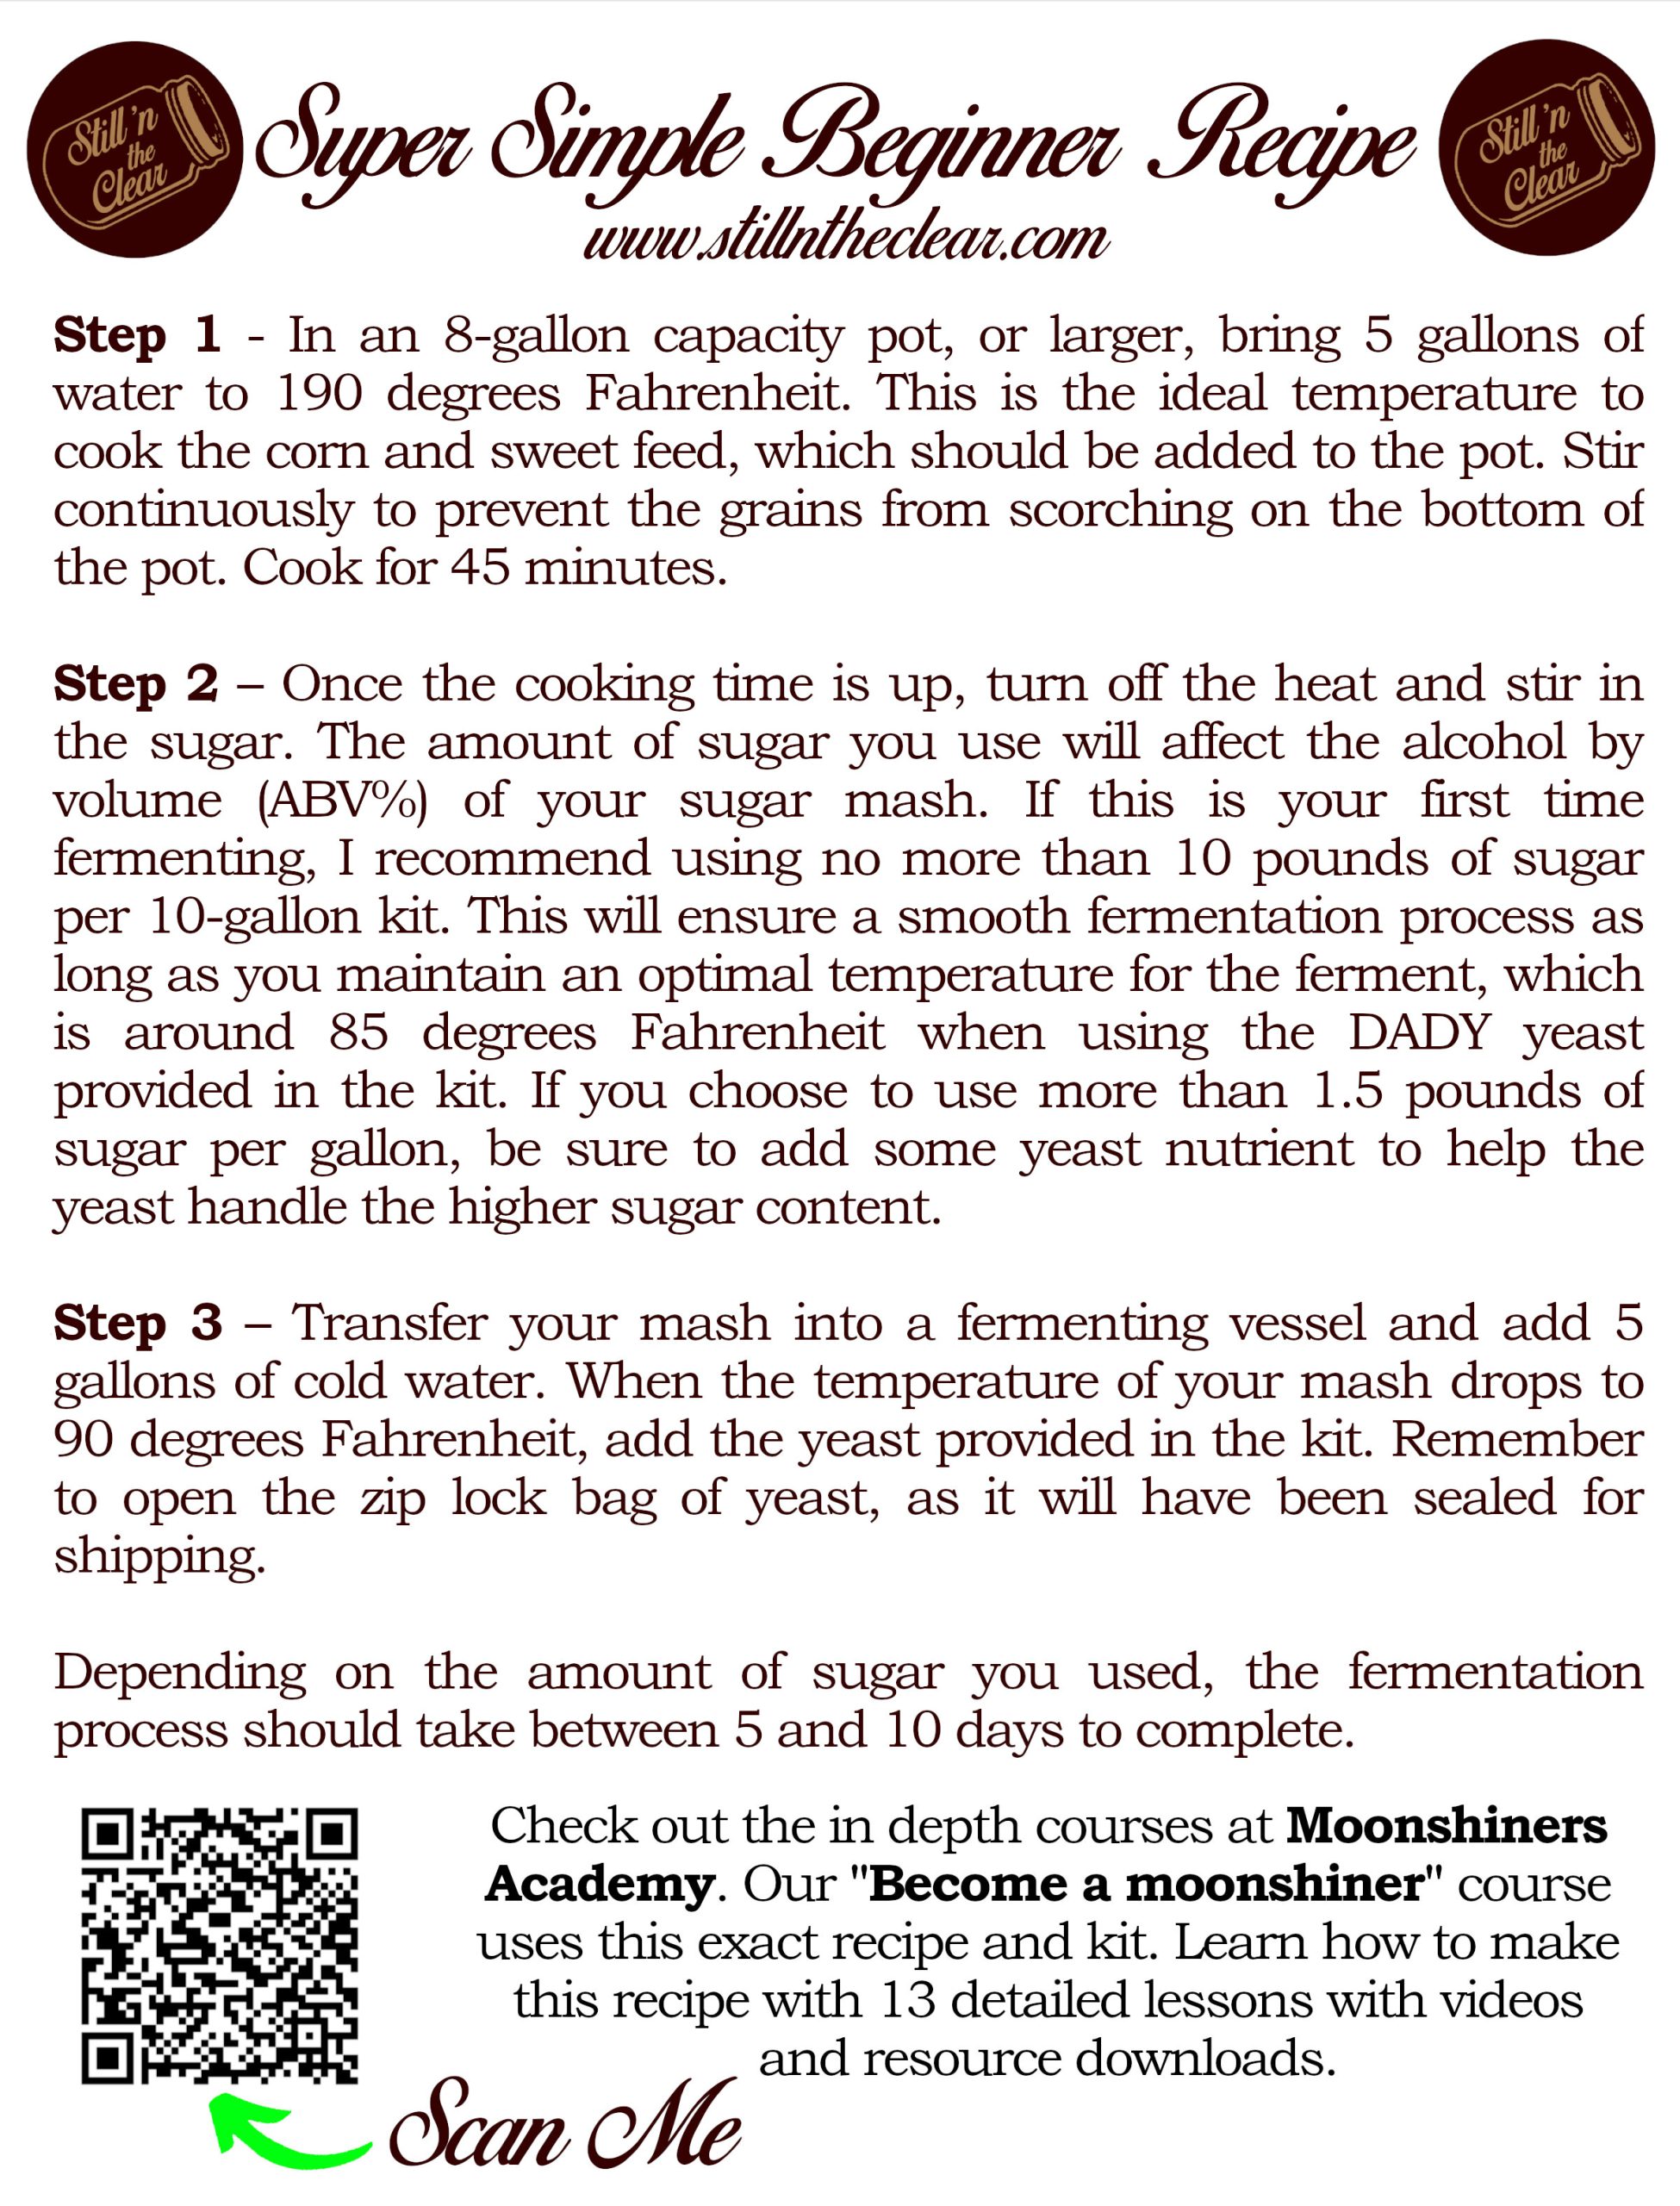
“Super Simple Beginner’s Recipe Kit …” from milehidistilling.com and used with no modifications.
Following a systematic approach to fermentation helps ensure consistent results. While many recipes exist, the fundamental process remains similar across traditional corn mash preparations. Attention to detail during each step builds the foundation for efficient fermentation and quality output.
1. Prepare Your Corn Mash Correctly
Start with properly crushed grains – corn should be cracked or flaked, not powdered or left whole. For traditional recipes, combine your corn (typically 5-10 pounds for a 5-gallon batch) with hot water around 165°F (74°C) to gelatinize the starches. Hold this temperature for 45-60 minutes while stirring regularly to prevent scorching. For most home distillers, adding malted barley (containing natural amylase enzymes) or commercial amylase helps convert these starches into fermentable sugars.
After conversion, cool your mash to proper pitching temperature (75-85°F) before adding yeast. Cooling too slowly can allow unwanted bacteria to multiply, while pitching yeast into too-hot mash will kill the yeast cells. Many brewers use immersion chillers or ice baths to speed this cooling process, especially for larger batches.
2. Add the Right Yeast at the Right Temperature
Select a yeast strain appropriate for your recipe and goals. High-alcohol tolerance strains like DADY (Distiller’s Active Dry Yeast) or turbo yeasts work well for higher ABV targets, while whiskey-specific strains may provide more desirable flavor compounds at the expense of longer fermentation times. Properly rehydrate dried yeast according to package directions – typically in warm water (95-105°F) for 15-20 minutes before pitching. For more insights into different types of alcohol, check out this article on the six types of alcohol.
Ensure your mash has cooled to the appropriate temperature range for your yeast strain before pitching. Most distiller’s yeasts perform best when pitched into mash between 75-85°F (24-29°C). Temperature differentials greater than 10°F between rehydration water and mash can shock yeast, extending the lag phase substantially.
3. Maintain Proper Fermentation Conditions
Place your fermenter in a location with stable temperature within the optimal range for your yeast. Temperature fluctuations stress yeast and extend fermentation time. During the first 2-3 days when fermentation is most vigorous, excess heat is generated – sometimes raising mash temperature by 5-10°F above ambient conditions. For larger batches, consider active temperature control methods like water baths or fermentation chambers.

Cover your fermenter with an airlock or breathable material like cheesecloth to allow carbon dioxide to escape while preventing contaminants from entering. Some traditional recipes call for occasional stirring during the first few days to release trapped CO₂ and redistribute yeast. However, once fermentation slows, minimize oxygen exposure to prevent oxidation and potential contamination.
4. Know When Fermentation is Complete
Patience is critical during the final days of fermentation. Primary fermentation typically completes within 3-7 days, but secondary fermentation where the final sugars are consumed may continue more subtly for another week. Complete fermentation is indicated by the absence of bubbling activity for at least 24-48 hours, clearing of the mash as yeast drops out of suspension, and stable hydrometer readings over consecutive days. Rushing this stage by distilling too early leads to lower yields and potentially off-flavors in the final product.
Typical Fermentation Timeframes for Different Recipes

“The Science of Fermentation: How Modern …” from www.labmanager.com and used with no modifications.
Recipe composition dramatically influences how long your corn mash will take to ferment completely. The ratio of fermentable sugars, nutrient availability, and the presence of other grains all play important roles in determining fermentation duration. Understanding typical timeframes helps set realistic expectations and proper planning.
While these timeframes provide general guidelines, remember that your specific conditions may result in variations. Temperature fluctuations, yeast health, and ingredient quality can all shift these timelines by several days in either direction. It’s always better to judge completion by fermentation indicators rather than strict calendar dates. If you’re interested in understanding more about when to stop distilling, it can offer further insights into the fermentation process.
Simple Corn and Sugar Mash: 3-5 Days
Quick-fermenting “sugar shine” recipes that combine cracked corn with significant amounts of refined sugar (often in equal parts by weight) typically ferment fastest. With proper nutrition and temperature control, these mashes can complete primary fermentation in as little as 3 days when using turbo yeasts. The refined sugar provides easily accessible fermentables that yeast can process quickly, while the corn contributes essential nutrients and flavor compounds.
These faster recipes typically produce higher alcohol content but sometimes lack the complexity of traditional all-grain mashes. They’re excellent for beginners or when time constraints are an issue. For best results, maintain temperatures at the higher end of the yeast’s range (80-85°F) and ensure proper nutrient additions, especially if using more than 40% refined sugar in your recipe.
Traditional All-Grain Corn Mash: 7-14 Days
All-grain recipes that rely exclusively on corn and other cereal grains without added sugar tend to ferment more slowly but develop richer flavor profiles. These traditional mashes typically take 7-14 days to complete fermentation fully. The extended timeline allows for more complex flavor development as secondary metabolites form during the longer fermentation period. Many traditional bourbon and whiskey distillers intentionally choose slower fermentations specifically for these flavor benefits.
The starch conversion process in all-grain mashes is more complex and sometimes less complete than with added sugar recipes. This means yeast must work harder to access fermentable sugars, extending the process. Using properly malted grains or supplemental enzymes helps ensure maximum conversion and more complete fermentation. Patience with these recipes typically rewards the distiller with more complex, authentic flavors.
High Gravity Corn Whiskey Mash: 10-21 Days
High-gravity recipes designed to maximize alcohol content often take the longest to ferment completely. These dense mashes with higher sugar concentrations create challenging environments for yeast as fermentation progresses. The increasing alcohol content becomes increasingly toxic to yeast cells, gradually slowing their metabolism. These recipes sometimes require specialized yeast strains with alcohol tolerances of 18% or higher.
The timeline for these potent mashes typically stretches from 10 days to as much as three weeks, with the final days showing very slow activity as the yeast struggle with the harsh environment. While these recipes can produce impressive alcohol yields, they require careful monitoring of yeast health through nutrient additions and temperature management. Many experienced distillers view the 14-day mark as the sweet spot for balancing alcohol yield with time efficiency.
Signs Your Corn Mash Has Finished Fermenting

“Is this bad? I opened my mash after …” from www.reddit.com and used with no modifications.
Knowing when fermentation is truly complete prevents the twin mistakes of rushing the process or waiting unnecessarily long. Multiple indicators work together to signal completion, and experienced distillers typically look for a combination of signs rather than relying on just one. Learning to read these signs accurately comes with practice and careful observation.
Visual Indicators to Watch For
The most obvious sign of active fermentation is bubbling or foaming as carbon dioxide is released. When this activity ceases completely for at least 24-48 hours, primary fermentation has likely finished. You’ll also notice the mash begins to clear as yeast cells flocculate (clump together) and settle to the bottom, leaving clearer liquid above. The cap of material that often rises to the top during active fermentation will typically fall back into the mash as fermentation completes. For more insights, you can check out this discussion on fermentation timelines.
The mash will often develop distinct layers as it completes fermentation – clearer liquid on top, suspended material in the middle, and a compact layer of settled yeast and grain solids at the bottom. These visual changes signal the transition from active to completed fermentation and provide easy indicators without special equipment. For those interested in experimenting with different mash recipes, you might want to try a blackberry brandy mash recipe for a unique flavor twist.

Using a Hydrometer to Confirm Completion
The most reliable method to verify complete fermentation is with consecutive hydrometer readings. A hydrometer measures the specific gravity (density) of your mash, indicating how much sugar remains unfermented. Take readings on consecutive days, and when the reading stabilizes (shows no change for 2-3 days), fermentation is complete. For most corn mashes, the final gravity typically falls between 0.990 and 1.010, depending on the recipe and yeast strain.
Hydrometer readings should be temperature-corrected for accuracy. Most hydrometers are calibrated to 60°F or 68°F, and readings taken at different temperatures require adjustment. Many online calculators can help with these corrections, or you can cool a small sample to the calibration temperature before measuring. This extra step ensures you’re getting accurate readings and not prematurely concluding fermentation is complete.
Taste and Smell Tests
While less scientific, experienced distillers often rely on sensory evaluation to judge fermentation completion. A fully fermented mash will have a distinctly dry, alcohol-forward taste with little residual sweetness. The aroma shifts from the fruity, sweet smell of active fermentation to a more complex, often yeasty or grain-forward scent. Any strong sweetness suggests incomplete fermentation, while excessive sourness might indicate contamination.
Taste testing should be done carefully – small samples using clean utensils to prevent introducing contaminants. This traditional approach, when combined with visual indicators and hydrometer readings, provides a comprehensive assessment of fermentation status that’s difficult to achieve with any single method alone. For more insights on fermentation and distillation, explore how to determine when to stop distilling during the process.
Common Problems That Extend Fermentation Time

“Fermentation Problems and How to Solve Them” from www.fermentingforfoodies.com and used with no modifications.
Even with careful preparation, fermentation doesn’t always proceed according to plan. Recognizing common issues helps you troubleshoot effectively when fermentation seems stalled or is taking longer than expected. Most problems can be remedied if caught early, saving batches that might otherwise be compromised.
Stuck Fermentation: Causes and Fixes
A stuck fermentation occurs when yeast activity slows or stops before consuming all available sugars. This commonly happens when the mash environment becomes stressful for yeast – due to excessive temperature fluctuations, nutrient deficiencies, or pH imbalances. The most common cause is inadequate nitrogen or other essential nutrients, especially in high-sugar recipes where the yeast population rapidly multiplies before running out of nutritional support.
Dealing With Contamination
Bacterial or wild yeast contamination competes with your brewing yeast for resources and can significantly extend fermentation time. Contamination often reveals itself through unusual smells (rotten eggs, vinegar, or medicinal aromas), unexpected clouding of previously clear mash, or pellicle formation (skin-like layer) on the surface. While some contamination is manageable, severe cases may require discarding the batch, especially if harmful bacteria are suspected.

Temperature Fluctuations
Temperature variations stress yeast cells and can cause them to go dormant temporarily. Fluctuations of more than 10°F within a 24-hour period are particularly problematic, often causing yeast to suspend activity while they adapt to the new conditions. Consistent temperature is more important than achieving the exact ideal temperature – a steady 72°F environment typically produces better results than one fluctuating between 68-85°F. For more insights into maintaining optimal conditions, check out this guide on distilling.
- Cold shock: Sudden temperature drops below 65°F can cause yeast to go dormant
- Heat stress: Temperatures above 90°F can kill yeast or create fusel alcohols
- Daily cycles: Even regular day/night temperature changes can extend fermentation time
- Seasonal challenges: Garage or basement fermentations often require different approaches in summer versus winter
To remedy temperature-related issues, consider insulating your fermentation vessel with blankets or a dedicated fermentation heater during colder months. During summer, cool water baths or placing the fermenter in a temperature-controlled space can prevent overheating. Many successful distillers use old refrigerators with external temperature controllers to maintain perfect conditions year-round.
Recovering a stalled fermentation often requires addressing multiple factors simultaneously. First, gently rouse the yeast by carefully stirring the mash to redistribute suspended yeast cells. Adding yeast nutrients (particularly nitrogen sources like diammonium phosphate) can provide essential resources for yeast metabolism. For stubborn cases, pitching a fresh, high-alcohol-tolerant yeast strain acclimated gradually to the partially fermented mash can often restart activity.
Prevention is always easier than recovery. Using proper nutrients from the start, maintaining sanitary equipment, and controlling fermentation temperature significantly reduces the likelihood of extended or incomplete fermentations. The small extra effort during setup pays dividends in reliable, timely results.
What to Do After Your Corn Mash Finishes Fermenting

“Corn Mash Recipe – How To Make Corn …” from www.clawhammersupply.com and used with no modifications.
Once fermentation is complete, timing becomes crucial again. The finished mash (now technically called “wash” in distilling terminology) should ideally be processed within a few days of completion. Extended waiting periods after fermentation increases the risk of oxidation and contamination, potentially affecting flavor and yield. If immediate distillation isn’t possible, store the wash in a cool environment with minimal headspace and an airlock in place.
Before distillation, many distillers choose to separate solid grain particles from the liquid through straining or siphoning. This step prevents scorching during heating and makes cleaning the still easier afterward. For maximum yield, both solid and liquid portions contain alcohol, though most is in the liquid phase. Traditional techniques often distill the entire mash, solids included, for authentic character and complete extraction. For those interested in trying different flavors, exploring various moonshine flavors can add a unique twist to the distillation process.
Distiller’s Tip: The window between complete fermentation and optimal distillation is relatively narrow – typically 1-5 days. Distilling too early captures undesirable fermentation byproducts, while waiting too long risks oxidation and bacterial growth. The sweet spot comes when bubbling has completely stopped, hydrometer readings remain stable for 48+ hours, and the wash has begun to clear but hasn’t developed any off-aromas.
The fermentation process fundamentally shapes your final product’s character. While distillation concentrates and refines these flavors, it cannot create what fermentation hasn’t already produced. This is why experienced distillers pay such careful attention to fermentation management – it’s the true foundation of quality spirits. The patience required during fermentation pays dividends in the smooth, complex character of your finished product.
Frequently Asked Questions
After years of helping fellow distillers troubleshoot their fermentations, I’ve found certain questions arise consistently. These common concerns reflect the challenges many face when working with corn mash fermentation timing. Addressing these issues directly can save considerable frustration and help you achieve more consistent results.
Can corn mash ferment too long?
Yes, corn mash can ferment too long, though the primary concern isn’t over-fermentation (yeast will stop naturally when fermentable sugars are consumed) but rather what happens after fermentation completes. Extended waiting periods after active fermentation increases exposure to oxygen and potential bacterial contamination. This can produce acetic acid (vinegar), develop off-flavors, or create conditions for harmful microorganisms to grow. As a general rule, try to process your wash within 5-7 days after fermentation completes for optimal flavor and safety.
Why is my corn mash taking longer than expected to ferment?
Slow fermentations usually stem from one or more common issues: temperatures outside the optimal range (too cold being most common), insufficient yeast nutrients, poor yeast health or underpitching, or recipe-related challenges like excessive sugar content. Check your fermentation temperature first, as this is the most common culprit – fermentations below 70°F may take twice as long as those at 80°F. Next, consider if your mash had adequate nutrients, particularly if using high proportions of refined sugar which lacks the natural nutrients found in grain. For those interested in exploring different mash recipes, you might find this blackberry brandy mash recipe insightful.
Do I need to stir my corn mash during fermentation?
Light stirring during the first 2-3 days of fermentation can be beneficial, particularly for thicker mashes. This helps release trapped CO₂ bubbles, redistributes yeast, and ensures even temperature throughout the mash. However, once fermentation slows down (typically after day 3-4), stirring should be minimized to reduce oxygen exposure and contamination risk. Some traditional recipes call for no stirring at all, relying instead on the natural circulation created by CO₂ production.
If you do choose to stir, use sanitized equipment and gentle motions to avoid introducing excessive oxygen. Excessive oxygen exposure late in fermentation can lead to oxidation of alcohols and development of cardboard-like off-flavors that will carry through to your final product.
What’s the minimum fermentation time for corn mash?
The absolute minimum fermentation time for a simple corn mash using turbo yeast under optimal conditions (80-85°F, proper nutrients, moderate gravity) is about 3 days. However, rushing fermentation typically sacrifices both yield and quality. Even with the fastest yeasts available, allowing 5-7 days provides more complete sugar conversion and better flavor development while giving the yeast time to reprocess some of the less desirable compounds created during peak fermentation.
Remember that distilling before fermentation is truly complete means leaving alcohol behind and potentially capturing undesirable compounds that yeast would otherwise clean up during the final days of fermentation. The small time savings rarely justifies the quality compromise.
Can I speed up the fermentation process safely?
Several legitimate techniques can moderately accelerate fermentation without compromising quality. Maintaining optimal temperature (upper end of yeast range, typically 80-85°F for most distiller’s yeasts) provides significant acceleration compared to cooler fermentations. Using yeast starters to build a robust initial population reduces lag time and gets fermentation moving quickly. Proper nutrient additions, particularly staggered nutrient additions with half at the start and half after 24-48 hours, supports yeast health throughout the process.
Avoid shortcuts like excessive yeast pitching rates, dangerously high temperatures, or chemical accelerants. These approaches often create fusel alcohols, stress compounds, and off-flavors that persist through distillation. The marginal time savings rarely justify the quality impact. Remember that fermentation is fundamentally a biological process that requires certain minimum timeframes for optimal results.
For those genuinely pressed for time, consider running smaller batches or investigating continuous fermentation systems that allow for ongoing production cycles. Many commercial operations use variations of these approaches to maintain constant production while still respecting the biological timelines required for quality fermentation.
The art of corn mash fermentation balances science, tradition, and patience. By understanding the factors that influence fermentation timing and recognizing when your mash has truly completed the process, you’ll consistently produce higher quality spirits with less frustration. Remember that while modern techniques can optimize the process, they can’t entirely circumvent the fundamental biological rhythms of yeast metabolism. Respect the process, and it will reward your patience with superior results. For those interested in the rich past of these practices, exploring moonshine history can provide valuable insights.
Still N The Clear provides complete corn mash ingredient kits with detailed instructions that help ensure proper fermentation timing for consistently excellent results. Our specially formulated nutrient blends and premium yeast selections are designed to support optimal fermentation regardless of your experience level.