How Do You Know When Moonshine Fermenting Is Complete?
Key Takeaways
- Fermentation is complete when airlock bubbling stops completely for at least 24-48 hours, which is the most reliable visual indicator without special equipment
- Using a hydrometer provides scientific certainty – when readings remain stable for three consecutive days, your mash is done fermenting
- Temperature significantly affects fermentation time – warmer temperatures (70-80°F) can complete in 5-7 days, while cooler temperatures may take 14+ days
- Clawhammer Supply offers comprehensive distilling equipment and expert guidance to help ensure your moonshine fermentation completes properly every time
- Rushing fermentation can result in lower alcohol yield and off-flavors, so patience and proper monitoring techniques are essential for quality moonshine
Knowing exactly when your moonshine mash has finished fermenting isn’t just about following a calendar – it’s about recognizing the specific signs that tell you when the yeast has completed its work. Making this determination correctly means the difference between a successful batch and wasted effort.
Whether you’re a first-time distiller or looking to refine your craft, understanding fermentation completion is crucial to producing quality moonshine. Clawhammer Supply’s distilling experts recommend focusing on multiple indicators rather than relying on just one sign. Their years of experience have shown that combining observational techniques with measurement provides the most reliable results.
Clear Signs Your Moonshine Mash Has Finished Fermenting
“Corn Mash Recipe – How To Make Corn …” from www.clawhammersupply.com and used with no modifications.
The fermentation process transforms your sugary mash into an alcohol-rich liquid ready for distillation. Complete fermentation ensures maximum alcohol yield and proper flavor development, making it perhaps the most critical stage in moonshine production. When properly completed, your mash will display several telltale indicators that the yeast has consumed all available sugars.
Visual cues provide your first clue – a completed fermentation typically results in a clearer liquid as yeast cells and other particles settle to the bottom. The layer on top will appear less foamy than during active fermentation, and you’ll notice a distinct separation between the liquid and sediment. Most importantly, the airlock will stop bubbling entirely, indicating that carbon dioxide production has ceased. For a deeper understanding of the fermentation process, you might find this moonshine yeast review helpful.
Beyond these visual signs, your mash will develop a distinctly different aroma. The sweet, fruity smell of active fermentation gives way to a more alcoholic, sometimes slightly sour scent. This olfactory change signals that sugars have been converted to alcohol, and fermentable materials have been depleted. Experienced distillers develop a sensitivity to these smell changes that becomes almost instinctual with practice.
The Science Behind Moonshine Fermentation

“What Is Fermentation? Definition and …” from sciencenotes.org and used with no modifications.
Understanding what happens during fermentation helps you recognize when it’s complete. At its core, fermentation is a biological process where yeast converts sugars into alcohol and carbon dioxide. This transformation is the foundation of all alcoholic beverages, including moonshine.
What Happens When Yeast Converts Sugar to Alcohol
When you pitch yeast into your mash, these single-celled organisms immediately begin consuming simple sugars, producing ethanol and CO₂ as byproducts. This process creates the familiar bubbling action visible during active fermentation. The yeast works through simple sugars first before tackling more complex carbohydrates, which is why fermentation activity gradually decreases rather than stopping abruptly.
Fermentation efficiency depends on multiple factors including yeast strain, sugar concentration, pH levels, nutrient availability, and temperature. Each yeast strain has a specific alcohol tolerance – the point at which the alcohol content becomes toxic to the yeast itself. Some distiller’s yeasts can tolerate up to 18-20% alcohol, while others max out around 12-14%. When yeast reaches its tolerance threshold or consumes all available sugars, fermentation naturally concludes.
- Simple sugars (glucose, fructose) are consumed first and fastest
- Complex sugars take longer to break down and ferment
- Yeast activity accelerates until reaching peak fermentation
- Activity gradually slows as sugar depletes or alcohol content rises
- Complete cessation indicates fermentation completion
Why Complete Fermentation Matters for Quality and Safety
Rushing to distill before fermentation completes fully results in lower alcohol yields and potentially inferior flavor profiles. Incomplete fermentation means unused sugars remain in your mash – sugars that could have been converted to additional alcohol. This directly impacts the efficiency and quality of your final product.
Beyond efficiency concerns, incomplete fermentation can create safety risks. When sugars remain in your mash during distillation, they can caramelize or burn, potentially creating off-flavors or even harmful compounds. Furthermore, inconsistent fermentation leads to inconsistent distillation runs, making it difficult to properly make cuts between foreshots, heads, hearts and tails during the distillation process.

Typical Fermentation Timeline for Different Mash Types
Fermentation duration varies significantly based on your mash composition. Corn-heavy mashes typically require 7-14 days, while fruit mashes might complete in 5-10 days due to their simpler sugar profiles. Sugar washes generally finish fastest, often within 4-7 days under ideal conditions. These timelines serve as general guidelines rather than hard rules, as environmental factors can substantially alter these durations. For more insights on fermentation, you can learn how to know when your mash is done fermenting.
Temperature plays a particularly influential role in fermentation speed. Warmer environments (75-85°F) accelerate yeast activity but may produce more fusel alcohols that create harsh flavors. Cooler temperatures (65-70°F) result in slower, cleaner fermentation. Most experienced distillers prefer the “low and slow” approach, sacrificing speed for quality and avoiding the off-flavors that rushed fermentation can produce.
5 Reliable Methods to Check Fermentation Completion
“Fruit Mash and Sugar Wash …” from learntomoonshine.com and used with no modifications.
While calendar guidelines provide rough estimates, proper verification requires specific testing methods. Using multiple approaches simultaneously gives you the most accurate assessment of your mash’s fermentation status. Let’s explore the most reliable techniques from simplest to most precise.
1. No More Bubbling in the Airlock
The airlock method provides the simplest visual indicator of fermentation activity. During active fermentation, carbon dioxide escapes through your fermentation vessel’s airlock, creating consistent bubbling. As fermentation slows, these bubbles become increasingly infrequent. When bubbling completely stops for at least 24-48 hours, you’ve reached a primary indicator that fermentation may be complete.
However, this method isn’t foolproof. Factors like poor airlock seals, temperature fluctuations, or barometric pressure changes can affect bubbling patterns. Some fermentations also enter a slower secondary phase where bubble activity becomes nearly imperceptible despite ongoing fermentation. While convenient, the airlock method works best when combined with other verification techniques, such as understanding how long it takes for moonshine to age.
2. Hydrometer Readings Show Consistent Specific Gravity
Using a hydrometer provides the most scientific and reliable method for determining fermentation completion. This simple device measures the density (specific gravity) of your mash relative to water. Before fermentation begins, your mash contains dissolved sugars that increase its density above water’s standard 1.000 reading. As yeast converts these sugars to alcohol, the specific gravity progressively decreases.
To implement this method, take an initial reading before adding yeast (original gravity or OG), then monitor with periodic measurements during fermentation. When you obtain identical readings on three consecutive days, fermentation has completed. Most moonshine mashes start with readings between 1.050-1.090 and finish around 0.990-1.010, though exact values depend on your specific recipe. This scientific approach eliminates guesswork and provides definitive confirmation of fermentation completion. For those interested in experimenting with flavors, check out some infused moonshine recipes to try after fermentation.
Hydrometer Reading Guide
Starting Gravity: 1.060-1.090 (corn mash)
Mid-Fermentation: 1.020-1.040 (variable)
Completed Fermentation: 0.990-1.010
Note: Three identical readings taken 24 hours apart confirm completion
3. Mash Appearance Changes to Look for
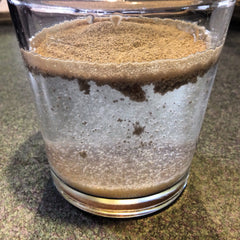
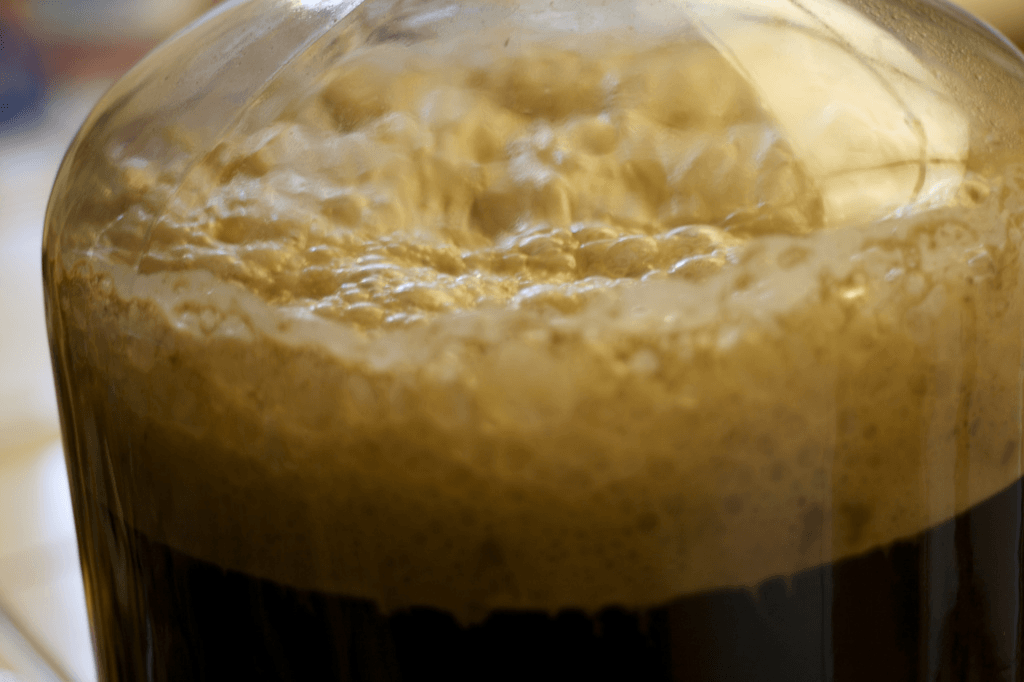
Visual inspection provides valuable clues about fermentation status without special equipment. As fermentation progresses, your mash undergoes distinct visual transformations that indicate its completion stage. Initially, active fermentation creates a foamy cap (called krausen) on the liquid’s surface, accompanied by cloudiness and visible movement within the mash. For more insights, you can explore how to tell when fermentation is complete without a hydrometer.
When fermentation completes, this activity ceases. The krausen disappears, and suspended particles settle to the bottom, creating a clearer liquid with a distinct separation between the liquid and sediment layers. The mash surface often appears still, with no visible activity. While these visual cues aren’t definitive proof, they serve as strong supporting evidence when combined with other methods.
4. Smell and Taste Tests That Indicate Completion
Your senses provide surprisingly accurate indicators of fermentation completion. During active fermentation, the mash emits distinctly sweet, fruity aromas with yeasty notes. As fermentation concludes, these sweeter scents diminish, replaced by sharper, more alcoholic aromas sometimes accompanied by slightly sour notes. This olfactory shift directly correlates with sugar conversion to alcohol, making it a reliable sensory indicator.

5. pH Testing for Advanced Brewers
For precision-minded distillers, pH monitoring offers another layer of verification. During fermentation, pH typically drops as yeast produces acidic compounds. This decline stabilizes once fermentation completes. Starting around pH 5.2-5.4, most mashes finish between 3.8-4.2, with the exact values varying by recipe.
Digital pH meters provide the most accurate readings, though pH test strips offer a more economical alternative with slightly less precision. When pH readings remain unchanged for 48 hours, it strongly suggests fermentation completion. This method proves particularly valuable when troubleshooting unusual fermentation behaviors or when developing standardized procedures for consistent results.
Advanced distillers sometimes combine pH testing with additional techniques like microscopic yeast cell examination or alcohol content verification through distillation tests. These methods require specialized equipment but provide unparalleled accuracy for commercial operations or perfectionists seeking to eliminate all guesswork. For those interested in traditional methods, exploring moonshining traditions can offer valuable insights.
Time-Based Guidelines for Moonshine Fermentation

“How To Make Moonshine: A Step By Step Guide” from www.clawhammersupply.com and used with no modifications.
While testing methods provide definitive answers, understanding typical timeframes helps set reasonable expectations for your fermentation process. These timelines help you plan your distilling schedule and recognize when fermentation might be stalling or proceeding abnormally quickly. For more insight, explore moonshining traditions that can influence your process.
Remember that these guidelines assume proper nutrient availability, appropriate yeast pitching rates, and suitable environmental conditions. Deviations from ideal conditions can significantly extend these timeframes, making verification methods essential regardless of calendar expectations.
Corn Mash Fermentation Duration
Corn-based mashes typically require the longest fermentation periods due to their complex carbohydrate structures. Under ideal conditions with proper enzyme conversion, corn mash fermentation generally takes 7-14 days. This extended timeline results from corn starches needing to be broken down into simpler sugars before yeast can convert them to alcohol.
The fermentation progression follows a predictable pattern: vigorous activity for the first 3-5 days, followed by a gradual slowdown as available sugars diminish. Temperature significantly impacts this timeline – at 75-80°F, expect completion closer to the 7-day mark, while cooler temperatures of 65-70°F often extend fermentation to the full 14 days or slightly longer. Traditional recipes using natural enzymes from malted grains may require even longer periods.
Fruit Mash Fermentation Timeframes
Fruit-based mashes ferment more rapidly than grain mashes because they contain higher proportions of simple sugars that yeast can immediately consume. Apple, peach, or berry mashes typically complete fermentation within 5-10 days under normal conditions. The natural sugar content and acidity of fruits create an ideal environment for yeast activity, contributing to this accelerated timeline.
Fruit mashes display particularly vigorous initial fermentation, often creating substantial foam during the first 48-72 hours. This activity tapers off noticeably around day 4-6, with complete cessation usually occurring by days 7-10. Some distillers intentionally allow fruit mashes slightly longer rest periods after apparent completion to develop more complex flavor profiles before distillation.

Sugar Wash Completion Estimates
Sugar washes represent the simplest fermentation scenario, consisting primarily of refined sugars that require minimal processing by yeast. These mashes typically complete fermentation in just 4-7 days under ideal conditions. The straightforward sugar profile allows for rapid consumption, making sugar washes popular for those prioritizing speed and efficiency.
Temperature plays an even more significant role with sugar washes – at the upper end of the temperature range (78-82°F), fermentation might complete in as little as 3-4 days. However, this speed comes at a potential cost to flavor development. Many experienced distillers still prefer allowing 5-7 days even for simple sugar washes to ensure complete sugar conversion and proper flavor development, particularly when turbo yeasts aren’t being used.
Common Fermentation Problems and Solutions
![]()
“Solution PNG Transparent Images Free …” from pngtree.com and used with no modifications.
Even with careful preparation, fermentation challenges occasionally arise. Recognizing and addressing these issues quickly can save batches that might otherwise fail. Most fermentation problems stem from environmental factors, ingredient quality, or process errors that can be corrected with proper intervention.
Stuck Fermentation: Causes and Fixes
Stuck fermentation occurs when the process halts prematurely, leaving unconverted sugars in your mash. This commonly results from insufficient nutrient levels, temperature fluctuations, or excessive initial sugar content overwhelming the yeast. The most reliable indicator of a stuck fermentation is when gravity readings stop decreasing but remain well above the expected final gravity for your recipe.
To revive a stuck fermentation, first verify your mash temperature falls within the ideal range for your yeast strain. Adding yeast nutrients (particularly nitrogen sources like diammonium phosphate) often reactivates sluggish yeast. For stubborn cases, preparing a “starter” with fresh, active yeast and gradually adding it to your mash can effectively restart the process. Gentle agitation to release trapped CO₂ and redistribute yeast can also help overcome minor stalls.
Dealing with Slow Fermentation
When fermentation progresses more slowly than expected but hasn’t completely stopped, temperature usually plays the key role. Too cool an environment significantly reduces yeast metabolism, extending fermentation timeframes well beyond normal expectations. Similarly, fluctuating temperatures stress yeast, causing inconsistent fermentation rates.
The simplest solution involves relocating your fermentation vessel to a warmer, temperature-stable location. Wrapping fermenters with insulating materials or using heating belts can maintain optimal temperatures during cooler weather. However, avoid sudden temperature increases exceeding 10°F, as thermal shock can stress or kill yeast. Patience remains crucial – allowing extended fermentation time often yields better results than attempting to dramatically accelerate the process through excessive heating.

Contamination Signs to Watch For
Bacterial or wild yeast contamination can compromise fermentation quality and safety. Warning signs include unusual colors (particularly green, blue, or black patches), foul odors resembling rotten eggs or vinegar, or slimy films across the mash surface. These indicators suggest potentially harmful microorganisms have infiltrated your fermentation.
Unfortunately, contaminated mashes rarely recover fully. While minor contamination might not render a batch unusable, significant contamination generally requires discarding the batch. Prevention through proper sanitation practices remains the most effective strategy. Always sanitize all equipment thoroughly, maintain clean fermentation environments, and consider using campden tablets or similar antimicrobial treatments in your initial mash when using fruit or other potentially contaminated ingredients.
What to Do After Fermentation Is Complete

“When Is Fermentation Done?” from www.fermentingforfoodies.com and used with no modifications.
Once you’ve confirmed fermentation completion through multiple verification methods, proper handling during the transition to distillation becomes critical. This intermediate stage significantly impacts your final product’s clarity, yield, and flavor profile. Taking time to properly prepare your fermented mash pays dividends in the quality of your distilled spirits.
Proper Straining Techniques
Before distilling, removing solid particles from your fermented mash improves both the distillation process and final product quality. Begin with a coarse straining using a large-mesh colander or cheesecloth to remove larger solids. For best results, follow with a second straining using finer filtration such as multiple layers of cheesecloth or a purpose-made filtering bag. Many distillers recommend allowing the mash to settle for 24-48 hours before straining, as this natural sedimentation process makes filtration more effective.
When straining corn or grain mashes, avoid squeezing the solids excessively, as this can release bitter tannins and unwanted compounds. Instead, allow gravity to naturally drain the liquid. Some distillers employ a cold-crash technique (rapidly cooling the mash to near-freezing) before straining, which causes more particulates to settle and improves clarity. Whatever method you choose, strive for the clearest possible liquid to prevent scorching during distillation and improve the cleanliness of your final spirit.
Moving to Distillation: Timing and Preparation
Ideal timing between completed fermentation and distillation balances practical considerations with flavor development. While technically you can distill immediately after confirming fermentation completion, allowing 24-72 hours of rest improves results in several ways. This resting period permits yeast and particulates to settle fully, clarifying the mash. It also allows certain harsh compounds to naturally dissipate and flavor components to stabilize. For more insights, you can explore how to tell when fermentation is complete.
During this waiting period, maintain your mash in a cool environment (50-65°F ideally) with minimal oxygen exposure. Some distillers use airlocks during this resting phase to prevent oxidation while allowing continued carbon dioxide release. When preparing for distillation, gradually bring your mash to room temperature if it’s been cold-crashed or refrigerated. Sudden temperature changes can release unwanted compounds and affect flavor. Finally, inspect your distillation equipment thoroughly before transferring your precious fermented mash – ensuring clean condensers, secure connections, and proper water flow prevents costly mistakes during the final transformation of your moonshine.
Frequently Asked Questions
The fermentation stage generates more questions than perhaps any other aspect of moonshine production. These frequently asked questions address the most common concerns that arise during the fermentation process, particularly regarding timing and completion indicators.
Can I still distill if fermentation isn’t completely finished?
While technically possible, distilling before fermentation completes is not recommended for several important reasons. Incomplete fermentation means unconverted sugars remain in your mash – sugars that could have become alcohol, directly reducing your yield. These remaining sugars can also caramelize during distillation, potentially scorching your still or creating off-flavors in your final product. Additionally, incomplete fermentation often indicates that the yeast is still producing flavor compounds, meaning your spirit’s flavor profile hasn’t fully developed. For best results, always confirm complete fermentation through stable hydrometer readings before proceeding to distillation.
How long should I wait after fermentation stops before distilling?
Allowing your completed mash to rest for 24-72 hours after fermentation finishes provides optimal results. This resting period permits yeast and particulates to settle completely, clarifies your mash, and allows certain harsh flavor compounds to naturally dissipate. The waiting period proves particularly beneficial for corn and grain mashes, which benefit from additional clarification time. However, don’t extend this waiting period beyond 5-7 days, as prolonged exposure to oxygen can lead to oxidation or encourage acetobacter growth that converts alcohol to vinegar. The ideal approach balances adequate settling time with minimizing exposure risks.
What temperature should my mash be during fermentation?
Optimal fermentation temperatures depend on your specific yeast strain, but most distiller’s yeasts perform best between 65-75°F (18-24°C). Traditional baker’s yeast typically prefers the warmer end of this range (70-75°F), while specialized distiller’s yeasts often perform well across the entire range. Temperature stability matters as much as the specific temperature – fluctuations stress yeast and can create off-flavors. Fermentation generates heat naturally, so ambient temperatures should typically be set 3-5°F below your target fermentation temperature. For best flavor development, most experienced distillers recommend maintaining temperatures in the 65-70°F range, which balances fermentation speed with flavor quality.
Can I reuse yeast from a completed fermentation?
Yeast recycling, sometimes called “yeast washing,” can be practiced successfully with proper technique. After fermentation completes, the settled yeast at the bottom contains viable cells that can ferment another batch. Collect this yeast slurry, rinse it several times with boiled-then-cooled water to remove spent material, and store it refrigerated in sterilized containers. This recycled yeast typically performs vigorously in subsequent batches since it’s already acclimated to your fermentation conditions.
However, limit recycling to 3-5 generations, as each reuse increases mutation risk and potential contamination. Also, avoid recycling from any batches that fermented sluggishly or developed off-flavors. While yeast recycling requires additional care and sanitation, many distillers find the improved fermentation performance and cost savings worthwhile. Some even report that second-generation yeast often performs better than first-use yeast.
How do I know if my mash has gone bad instead of just finishing?
Distinguishing between completed fermentation and spoilage requires careful sensory evaluation. A properly finished mash should smell alcoholic with mild fruity or grainy notes depending on your ingredients. While a slight tartness is normal, strong vinegar smells indicate acetobacter contamination has converted alcohol to acetic acid. Similarly, rotten egg odors suggest hydrogen sulfide production from stressed yeast or bacterial contamination.
Visually inspect your mash for unusual colors – blue, green, or black patches indicate mold growth, while slick, oily films suggest bacterial contamination. Even without visible signs, trust your nose – putrid, garbage-like, or chemical smells that make you physically recoil indicate spoilage. When in doubt about a questionable batch, the safest approach is to discard it rather than risk distilling contaminated mash that could produce harmful compounds.
With practice, you’ll develop confidence in distinguishing between normal fermentation characteristics and problematic spoilage indicators. Keeping detailed records of how your successful batches smell and appear provides valuable reference points for identifying when something has truly gone wrong rather than just completed normally.
Clawhammer Supply’s distilling equipment and expert guidance can help you master the fermentation process for consistently excellent moonshine. Their precision-crafted stills and comprehensive learning resources make achieving perfect fermentation easier than ever.